
Note: This post may contain affiliate links, meaning I get a commission if you decide to purchase something through the links, at no additional cost to you.
I want to yell from the rooftops and tell everyone I know to plan a visit to Mojave National Preserve, while at the same not tell a single soul so it remains a hidden gem because this road trip was that spectacular to me.
I first learned about some of these unique locations featured in this blog while I was working for a travel destination marketing company. Visit CA Deserts was one of our clients, and they’d just recently had a creator visit the area to capture content. I remember writing “Mojave National Preserve” down in my notes app as a reminder to research later. Fast forward a few years, I saw it sitting in my notes app randomly one day and shared it with my mom. Next thing I know, we were planning and executing a two-day road trip in the middle of nowhere! We’ve driven through the area many times before, and wow, I had no idea there were so many incredible hidden gems out in this seemingly barren desert.
So, if you’re looking for a unique desert adventure, look no further than the Mojave National Preserve located in Southern California! Here is a detailed 2-day road trip itinerary jam-packed with everything I’d recommend seeing and doing while visiting the Mojave National Preserve. Happy road-tripping!

Map Courtesy of NPS.gov
Getting There
From Palm Springs
via Highway 62 – About 2.5 – 3 hours
- Start from Palm Springs and head east on Highway 62.
- Turn left on Godwin Road. Then, in 2 miles, turn right on Amboy Road.
- Follow that down to Route 66 Highway and make a right.
- Then, in 6.7 miles, you’ll make a left on Kelbaker Road towards the Providence Mountains.
- In 11 miles, turn right onto Highway 40 and head east 21 miles until you reach Essex Road, then go North.
- Stay left and follow Essex Road towards the Mitchell Caverns Visitors Center.
From Los Angeles
About 3.5 – 4 hours
- Head east out of Los Angeles on I-10.
- Take I-15 North. Follow signs for Barstow/Las Vegas.
- Merge onto I-40 East. Continue on I-40 toward Needles.
- Take Exit 100 for Essex Road. Turn left onto Essex Road.
- Drive North on Essex Road. Continue for about 16 miles. You’ll see signs for Providence Mountains State Recreation Area.
- Arrive at Mitchell Caverns Visitors Center.
From Las Vegas
About 1.5 – 2 hours
- Start on I-15 South. Head south from Las Vegas towards Barstow.
- Take Exit 184 for Nipton Road/CA-164. Turn left onto Nipton Road (CA-164) and head east.
- Turn Right on Ivanpah Road. Follow Ivanpah Road south.
- Turn Left onto Morning Star Mine Road. Continue through the Mojave National Preserve.
- Turn Left onto Essex Road. Follow Essex Road for about 16 miles.
- Arrive at Mitchell Caverns Visitors Center. The entrance will be within Providence Mountains State Recreation Area.
Search for a car rental
Day 1: Mitchell Caverns & Hole-in-the-Wall Rings Hike
Mitchell Caverns
Our journey began with a road trip to the Mitchell Caverns. The Mitchell Caverns are located in the Providence Mountains State Recreation Area, at an elevation of about 4,300 ft. They reopened for public tours in November 2017. As the only limestone caves in the California State Park system, this tour is incredible and a must-do. Seriously, I can not recommend it enough; it was awesome. Our tour guide was exceptionally knowledgeable and quirky, and the pictures we captured inside the cave don’t do justice to what you’ll see with your eyes in person.

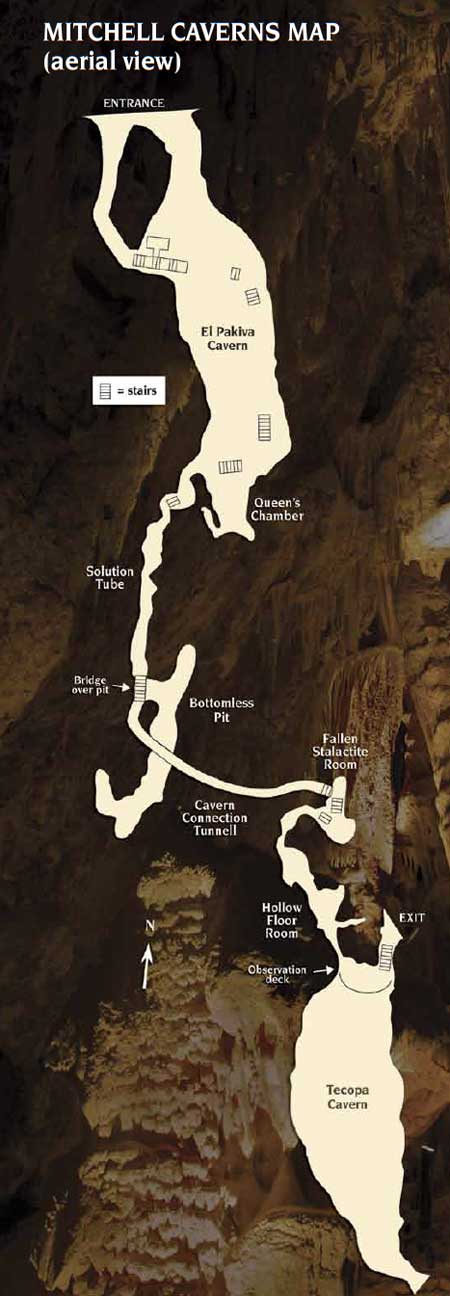
Map Credit: DesertUSA.com
The Story
The caverns were originally known to the Chemehuevi people, the Indigenous inhabitants of the region, who viewed them with spiritual significance. Later, in the late 1800s, prospectors and miners stumbled upon the caves while searching for silver, gold, and other minerals in the desert. However, it wasn’t until Jack Mitchell arrived in 1934 that the caverns became known to the public. He recognized their potential as a tourist attraction and, along with his wife Ida, turned them into a roadside destination, leading guided tours.

Know Before You Go:
- The Mitchell Caverns are only accessible by tour.
- Tours are 2-hours long and must be made in advance here.
- They are available October-May only at 11 a.m. and 2 p.m. on Fridays, Saturdays, and Sundays (and Holiday Mondays).
- $20 per adult & $10 per child (16 and below)
- Arrive 15 minutes before your scheduled tour.
The Mitchell Caverns Visitor Center is where you’ll check in and meet the ranger guide who will lead you through the caverns. It’s also a charming museum housed in one of the original stone buildings built by Jack Mitchell. The information desk is staffed by friendly, knowledgeable park employees who are happy to share their expertise about the area’s history and natural surroundings.

When you’re driving to the visitors center, you’ll first see a parking area at the bottom of a steep road with public restrooms and a campground. I would recommend stopping here first to use the restroom, and then driving up to the parking lot at the top, adjacent to the visitors center.


If you arrive early and have checked in already, there’s also a 0.5-mile, easy loop trail located near the visitors center with great scenic views of the surrounding Mojave Desert.


The Tour
The tour begins at the visitor center. A ranger will lead you along a ¾-mile hike to the cave through “sky island”, a unique higher-elevation area in the middle of the desert that has its own mini ecosystem. You’ll see plants like pinyon pines, juniper trees, and manzanita bushes that don’t grow in the lower, drier parts of the Mojave. And keep your eyes open, some of the bugs and critters that live up there can’t be found anywhere else in the world.

Along the way to the cave, you’ll also experience great views of the surrounding desert and learn about the area’s mining and biological history. Your tour guide will also go into way more fun details about Jack and Ida’s story.


The guided cave tour lasts about 2 hours, covering a total distance of 1.5 miles (including the trail to and from the cave), with stairs and occasional low and narrow passages.
Once Inside, you’ll encounter:
- Stalactites, stalagmites, draperies, curtains, helictites
- Rimstone dams and “lily pad” formations
- Popcorn and cave coral textures
- A rare column, where stalactite meets stalagmite (Only 1 in 4,000 caves feature this!)
Your tour guide will explain these in way better detail than I could ever conjure up.

Temperatures inside remain a comfortable mid‑60s°F year-round. The thick layers of rock and soil above and around the cave shield it from the weather. So even if it’s blazing hot in the desert or freezing cold in winter, those temperature swings don’t reach deep into the cave.

Just look at those stalactites!!
I do remember that the stalactites are the icicle-shaped mineral formations that hang from the ceilings of caves because they “hang tight” from the ceiling, and stalagmites “grow with all their might” from the cave floors.

After you finish up your tour of Mitchell Caverns, I’d recommend heading back down to the picnic benches near the campgrounds and restrooms and enjoying a packed lunch and some snacks before heading back out on the road.
Hole-in-the-Wall Rings Hike
Getting There (from Mitchell Caverns)
- Distance: About 35 miles
- Drive time: Around 1 hour
- Route: From the Mitchell Caverns turnoff, head south on Essex Road. Then, take a right on Black Canyon Road and follow it north for roughly 20 miles to the Hole-in-the-Wall Visitor’s Center.


Know Before You Go
- Parking is FREE
- The hike does require some arm strength as you have to pull yourself up on iron rings.
- Best time to visit is between September–May; very hot in summer .
- Cell service is very spotty so don’t count on reception to know where you are and where to go.
The Trail
- Distance: 1.4 mile loop
- Duration: About 1 hour
- Elevation gain: Around 131 ft.
- Difficulty: Rated Moderate
The trail starts right behind the Hole-in-the-Wall Visitor Center, where you’ll find trail signs pointing you toward the loop. The beginning of the hike is very flat and sandy; you’ll see yucca, creosote, and cactus.


As the trail wraps around, you’ll start to see the landscape close in. The sand gives way to rocky, narrow walls as you enter Banshee Canyon, where the real fun begins.


As the trail wraps around, you’ll start to see steep, rocky walls. This is known as Banshee Canyon. Hole-in-the-Wall gets its name because of those unique holes in the rock walls.

There’s two sections in the canyon that have steel ring bolts anchored into the rock. Hikers climb down (or up) using these rings.


It’s a fun and pretty easy family hike. It’s really only rated moderate because, again, it does require some arm strength to ascend up the rings.
After finishing up the hike, we headed out of the preserve and towards the hotel we were staying at for the night.. The closest option is just over an hour away in the small town of Primm.
Where to Stay
Buffalo Bill’s Resort & Casino (Primm, NV)
We stayed the night at Buffalo Bill’s Resort & Casino, located just off I‑15 in Primm. It’s the closest hotel to the Mojave Preserve. It’s not luxury-level, but it perfectly suits an overnight stay. For us, it was exactly what we needed: a clean room, easy access to gas, food, and a comfy bed after hiking.

A lot was under renovation when we went. The iconic buffalo-shaped pool has just reopened (I read as of May 2025), and The Desperado roller coaster is now undergoing regular maintenance checks, but is not open for rides yet. Other entertainment features like the log flume also haven’t reopened since the pandemic. But, for a place to lay your head in between two jam-packed days of exploring, it was just what we needed..


Other Nearby Accommodations
- Primm Valley Resort & Casino (next door): A slightly more upscale sibling property, with similar amenities plus a golf course and spa. Worth considering for longer stays or if you seek a few extra perks.
- Barstow area motels (102 miles away): Options like Best Western Desert Villa Inn and Super 8 offer budget-friendly stays, but at a much longer drive (1 hr 45 min).
- Camping within the preserve: The preserve itself offers two developed campgrounds and group sites, great for stargazing.
Day 2: Teutonia Peak, Lava Tubes & Kelso Dunes
Teutonia Peak
Day two started with an early morning departure from Primm. We headed south back into the Mojave National Preserve. Teutonia Peak Trail is located near the northern edge of the Cima Dome. The drive to the trailhead takes just under an hour and winds through open desert landscapes and iconic Joshua trees.

The Trail
- Distance: 4 miles, out & back
- Duration: About 2 hours
- Elevation gain: 700 ft.
- Difficulty: Rated Moderate
The trail takes you along what was once the densest Joshua tree forest in the world. Although parts of the area were affected by the 2020 Dome Fire, you’ll still see a very dense population of these iconic trees.

As the trail climbs gradually, you’ll be treated to sweeping views of the Mojave Desert and surrounding mountains. The summit of Teutonia Peak provides a full panorama.


Lava Tubes
After hiking Teutonia Peak, we continued our Mojave adventure with a short detour to one of the preserve’s most photogenic spots: the Lava Tubes.
How to Get There
From the Teutonia Peak trailhead, head south on Cima Road for about 15 miles, then turn left onto Aiken Mine Road, a wide dirt road (high clearance is recommended, but in dry conditions, most vehicles can make it if driven carefully). Follow Aiken Mine Road for approximately 5 miles. Keep an eye out for a small sign on the left and a marked parking area. It’s easy to miss if you’re not paying attention.

The Walk to the Tubes
From the parking lot, it’s a quick 0.25-mile walk to the entrance of the Lava Tubes. After walking on the path for a few minutes, you’ll start to spot a metal staircase inside a large hole in the ground. That is where you’ll enter down into the cave.


Know Before You Go
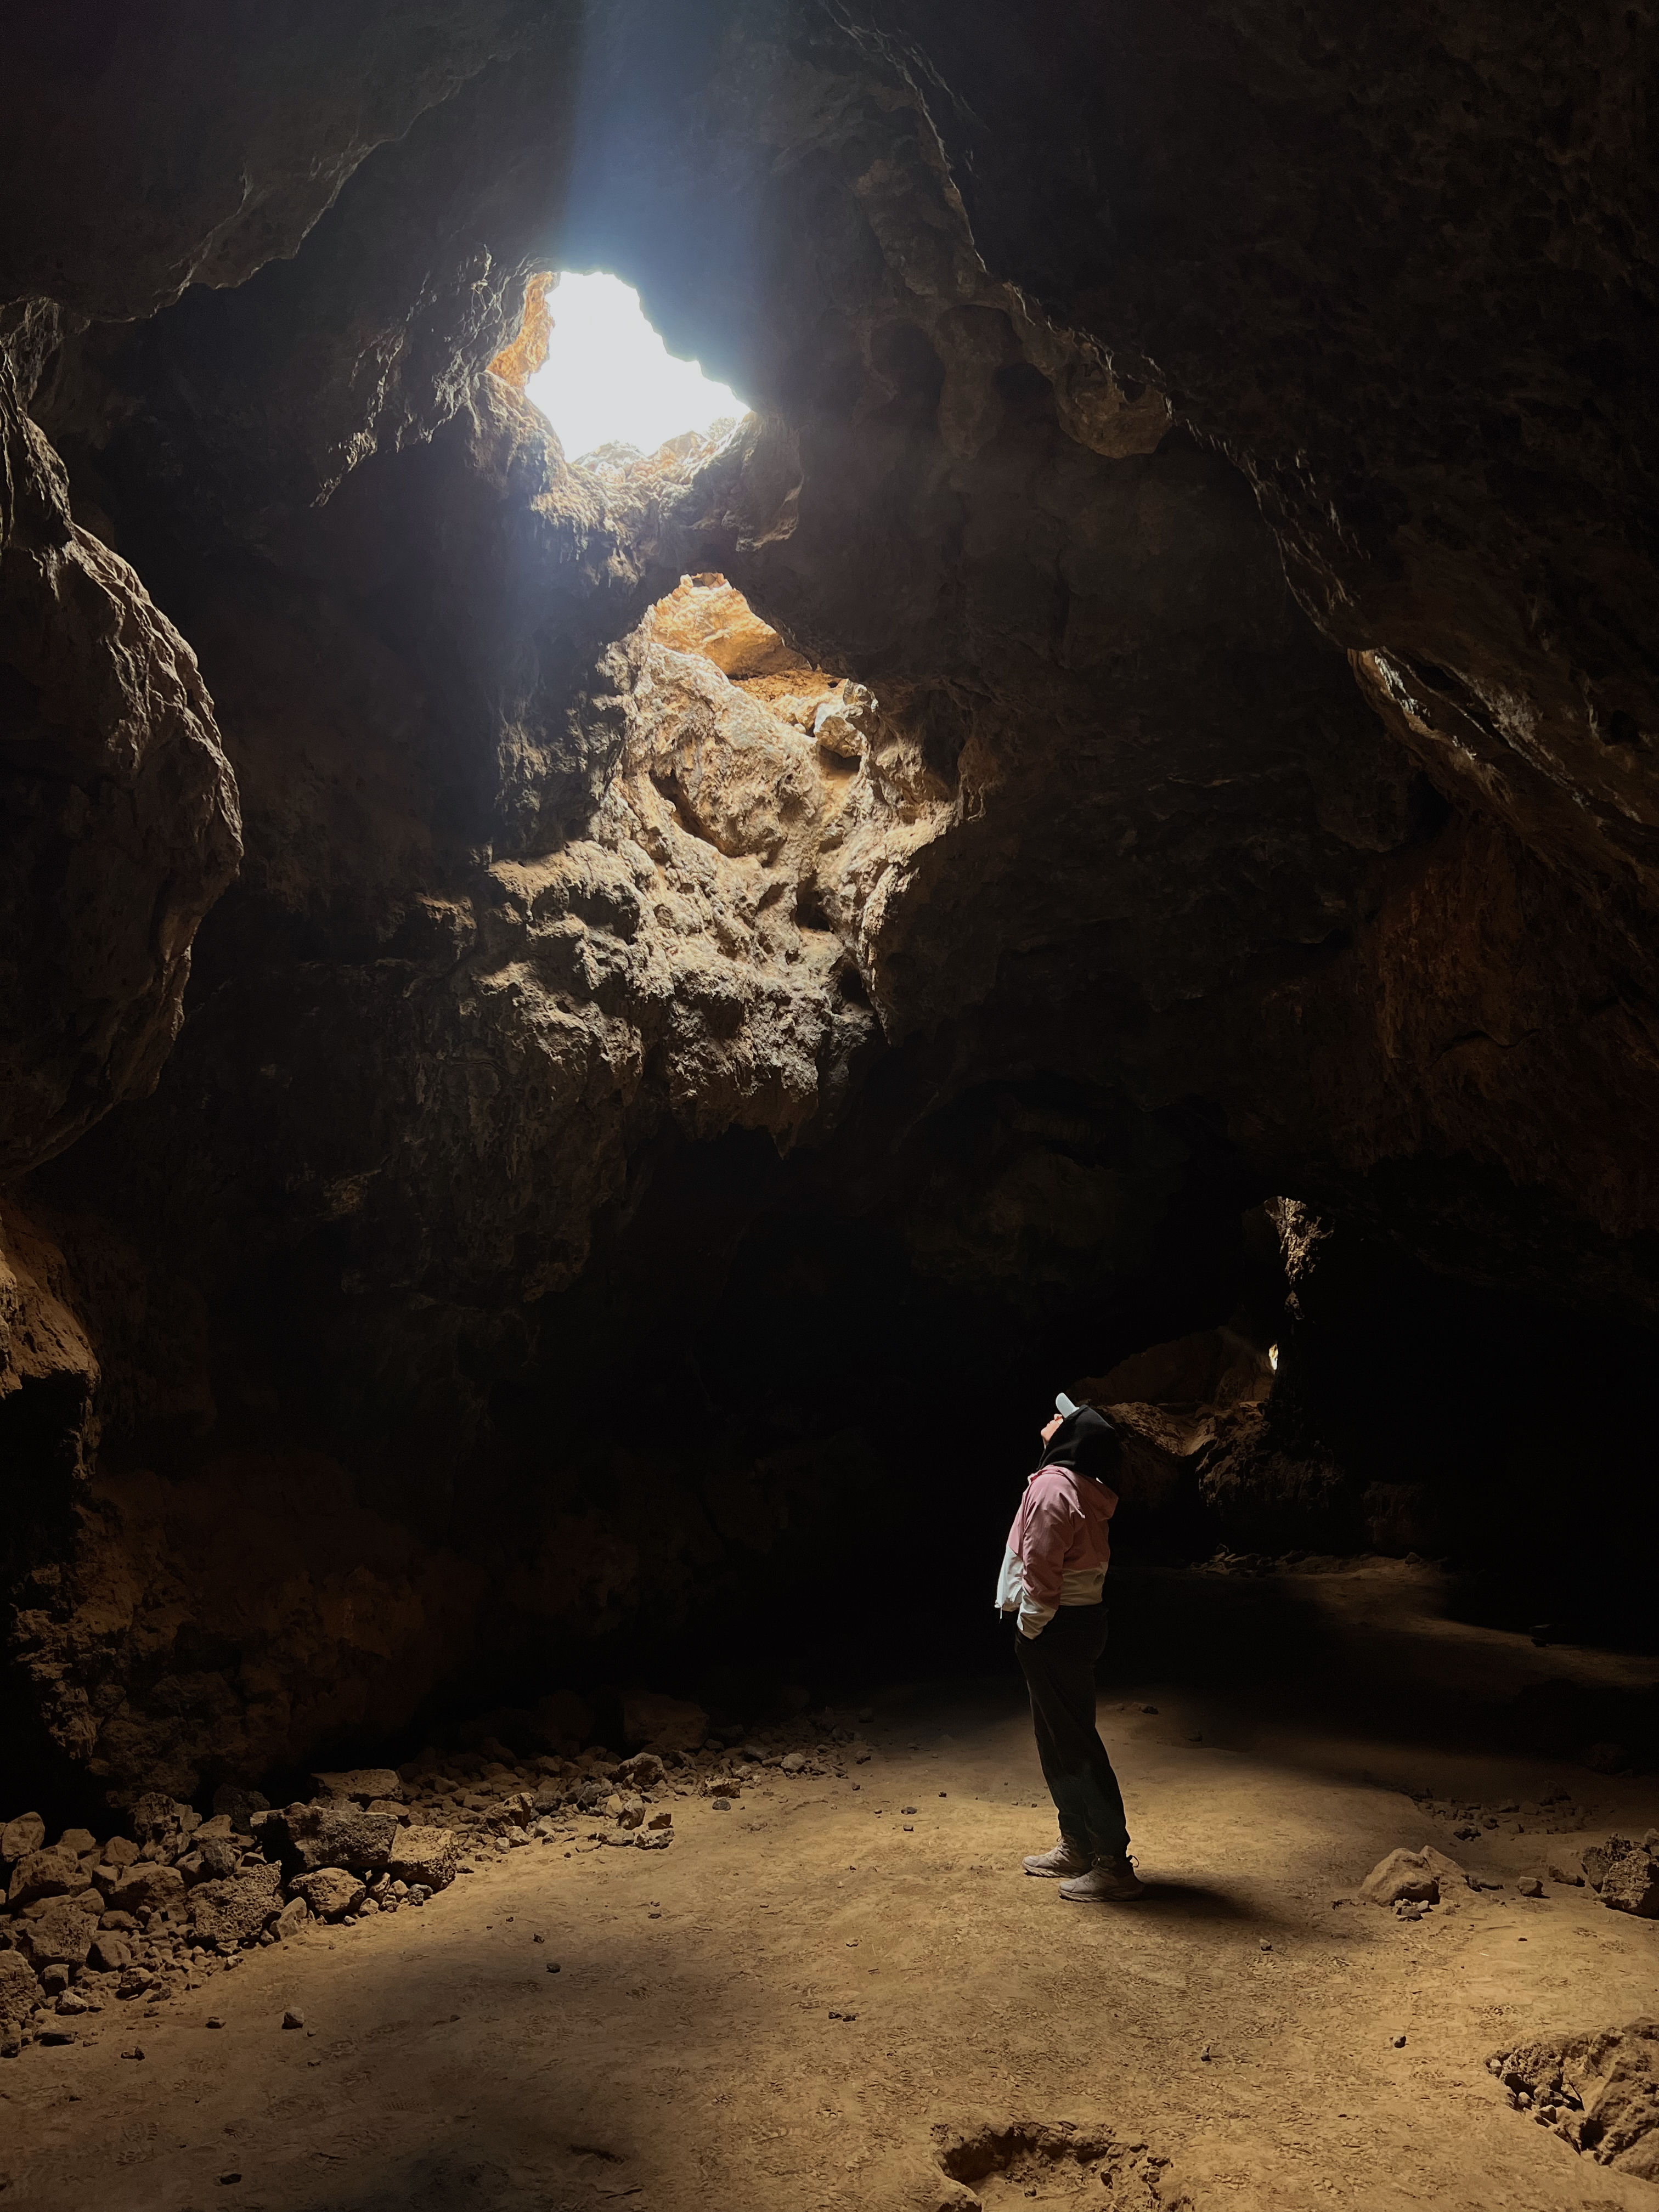
- Bring a headlamp. When you first climb through the cave, it’s pitch black, and your iPhone flashlight won’t help at all.
- To see the iconic light beams that filter through the holes in the cave ceiling, aim to arrive between 11 AM and 1 PM, when the sun is at its highest.
- Dust in the air helps highlight the beams. Gather some dirt in your hands and toss it in the air or gently kick up some dirt before snapping photos to get the iconic pictures you may have seen online. We visited at the right time, so we were able to catch the light beam, but I didn’t know about the dirt trick until after visiting unfortunately.


Kelso Dunes
And last but certainly not least, we made a quick stop at the Kelso Dunes before heading out. To be honest, we were pretty beat and ready to get on the road when we arrived here, so we did not hike in very far, but it was still cool to see..

The hike to the top is about 3 miles round-trip with 600 feet of elevation gain, and while the trail isn’t technically difficult, hiking through sand is a serious workout. There’s no official trail, just follow the footprints up the ridgeline. Most visitors aim to start around sunrise or late afternoon to avoid the heat and catch the dunes in their most photogenic light. It does also get prettier the further in you hike, or so we heard anyway.
What to Know Before You Go
- Dogs are allowed, but the sand can get hot. It’s best to go early or late in the day if you’re bringing your pup.
- There are no facilities at this trailhead.

And that officially marks the end of this awesome 2-day road trip! I hope you enjoyed following along on this Mojave Desert adventure as much as I loved putting it together. It was one of those trips that surprised us in the best way possible. I never realized just how many cool hidden gems were tucked away right in the middle of the desert.
If you made it this far, thanks so much for reading. As always, travel on, my friends!